
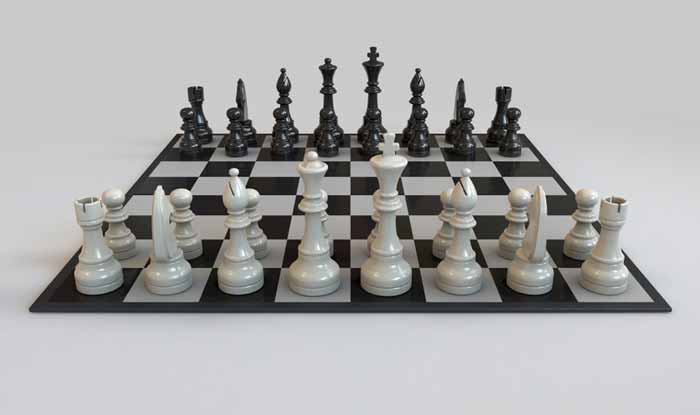
For beginners one of the things they get wrong the most is the arrangement of the chessboard, this is astonishing since this is pretty easy. Now I am not putting down beginners for a thing they have never studied, but my point is that you can easily set up a chess board if you want to.
After reading this article you should be able to set up a chessboard accurately and easily, I will take things step by step to make sure that you get it. This is pretty important since you can’t play if you can’t even set up the board, keep on reading if you are interested.
Table of Contents
Step 1: Position the board and its chess notations
The first step in setting up a chess board is to have the chess board and chess pieces in the first place, maybe buy this in your local dollar store. After that look for the chess notations (basically the number and letters at the side of the board) and position them neatly, they should be readable on the side for the one who has the white pieces.
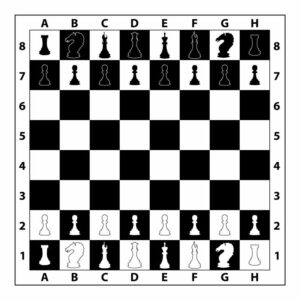
There are some chess boards that have notations on its side (made up of numbers and letters), make sure that both players are sitting in front of the letters which would make the files. The files which are the horizontal bits of the board should have the letters instead of the numbers, make sure that both the players are sitting in front of it.
To do this it is important to always set the chessboard in a way that the bottom right corner is a light-colored square, this is another easy way to accomplish this. Most beginners would have no idea what files and ranks would mean in chess, so it is best to follow the light square rule.
Just make the light square part of the board in the bottom right corner of the one with the white pieces, if you are playing black then you would have the inverse position. The light squared color tile should also be in your bottom right corner if you are playing black, this ensures that the ranks and files would be suited for the engraved notation.
Step 2: Place the rooks in all corners (similar colors should be horizontal from each other).
After you have properly set up the chess notations and the files and ranks, it is now time to place the pieces, you should start with the rook to make things easy. The rooks will just go to the corners of the board so you wouldn’t have to be confused on this one, the only thing to note is that you should place them horizontally with each other.
The rooks should be placed after initially setting up a chessboard the right way, add the four rooks among the four corners of the board. The white rooks should be placed in the a1 and h1 squares while the black rooks go to the a8 and h8 squares, this will be used as the foundation when placing the other pieces.
If you have placed the chessboard in a way where the ranks and files are in the right place (light a square tile at the corner of the board) then you can easily make this association. When I say that they are horizontal with each other I mean that they should be in the same rank, so from the a-tile to the h-tile they would be the same color of rooks.
Across them would have the different color, a8 rook should be the black roof while the h8 rook should also be a block of rock, basically meaning that when facing each other they should have the different color. On the other hand when they are by each other side, the color of the rooks should be the same, from this we will place the corresponding pieces in a way that they are side by side by each other.
Step 3: Place the knights next to the rooks
After properly placing the rooks it is best to go with the knights, they are easy pickings since they would literally go by side of the rooks. It is easier for beginners to do it this way since you wouldn’t have to identify the squares, just place them right next to the rooks and you can accomplish this.
The knights go next to the rooks that have been placed over the edge, the white knights should be in the b1 and g1 squares respectively while the black knights go to b8 and g8. Just make sure to place the knights after the rooks in order to not be confused, this is consistent with the setup’s symmetrical pattern.
Just follow the same pattern that we have established for the rook, the same color should be on each other’s sides and they shouldn’t be the opposite. When we are talking about pieces that are across then they should be opposite in color, but it is easier to look at the rooks next to them.
If you have placed the rooks properly, that is the a-1 and the h-1 squares, you can just follow their lead and place the corresponding color knights next to them. In the b-1 and g-1 squares goes the white knights which is next to the white rooks, and in the b-8 and g-8 squares goes the black knights placed next to the black rooks.
Step 4: Place the bishops next to the knights
Next after placing the knights in their corresponding squares follow it with the bishop, the rule here is pretty much the same as when we have placed the knights so it will be easier. For beginners it will be doable since you have already placed the markers on the knights, just place the bishops with the same color next to them.
After placing the knights you should line up the bishops, place them next to the knights as how the knights were placed next to the rooks. In chess notation terms this would be the c1 and f1 squares for the white bishops and the c8 and f8 squares for the black bishops, this way you will not be confused by their placements.
As per the rule that we have established above, the same color would be right next to each other side and not across, placing them in the same rank as the others. If you look across their respective tiles they should be in the opposite color while they should be the same by each other, place them next to the knights for easier placement.
The c1 and f1 squares should be strictly for the white bishops and the c8 and f8 squares should be for the black bishops, this would make it easier for you to place them correctly. If you place them incorrectly it would mess up the formation, just follow the same procedure that you did with the knights (placing them next to the rooks) and place the bishop next to the knights.
Step 5: Place the queen on the remaining square of the same color
Now this is the tricky part and the one where a lot of people get confused with, which is where to place the queen and the king. It is actually quite easy to distinguish, just remember from the previous setup you should add the queen on the square that has the same color.
So if you are playing the white pieces then you should place the queen in the tile that has the same color, in this case it would be the remaining white tile. Accordingly you should place the black queen at the same tile color, in this case it would be the black (or dark square tile).
After you have placed the pieces in the corresponding rank (horizontal line) there will only be two remaining squares, you should place the queen in the tile that has the same color as the queen. If you are playing the white pieces then the white queen goes to the white tile and so on, it can’t be the opposite of this.
In chess notation terms the white queen goes to the d-1 square and the black queen goes to the d-8 square, this would make it easier to remember if you do this. For a beginner this would be the most confusing part but it doesn’t have to be, just place the queen in the square that has the same color while the king will go to the other.
Step 6: Place the king on the remaining square of the different color
Now that we have set up all of the pieces it is easy to determine where to place the king, just insert it on the remaining square of the respective horizontal line (rank). If we are talking in chess notations this would be the e1 and e8 square, check with the notational guide to make sure that you get it correctly.
After everything is set up it is easy to determine which tile to place the king, of course it goes to the remaining square left in the board. What I mean by this is if you look at everything horizontally you should notice that everything is in a rank (horizontal) this is for a reason.
All the major and minor pieces really should be placed in a horizontal fashion, since chess in itself is based on a war game where both sides are facing each other. So if you are playing white the white king will go to the e1 square while black will have e8, so the black king will go to e8 in opposition to the white king.
If this is still not enough for you ten you can still look at the color of the squares, the white king should go to the white square while the black king should go to the blsck square. So from the setup with the queen before where the queen of the same color as the queen will have the queen, it is now the opposite with the king going to its opposite color tile.
Step 7: Place the 8 pawns in front of all the respective pieces
After everything we have already placed all of the major and minor pieces, the only remaining are the pawns, they are actually some of the easiest to place out of all. Even beginners usually don’t have much struggle putting the pawns in place; they after all, get to the same rank (horizontal line) in front of the pieces.
After every piece has been put on their respective squares it is time to place all of the pawns, this is quite easy as they have a memorable pattern. They all go in front of the pieces in a horizontal line (rank), this would lead the white pawns to the 2nd rank and black pawns in the 7th rank.
If you have noticed so far, all of the major and minor pieces have been placed in a straight horizontal line (rank), just place all the pawns in front of them. For white this would be the second rank and for black this would be seventh rank, for people who can understand notations follow this.
Another reason why it’s so easy to place the pawns comes with their memorable placement; they basically just go side by side with each other, and in a straight line at that. Just make sure that they are on the right side and no coloris misplaced, then lay out everything and everything should be complete now.
Extra step: Look at the lichess or chess.com chessboard setup for reference
The guide above should be easy to follow but there is another way to quickly set up the chessboard, look at lichess and chess.com for reference. You can even use this to automatically have the platform set the pieces up for you, this would make remembering the placement quite easy.
Now it is important to remember that it is always best to know how to do it yourself, there are some occasions where you don’t have the internet to save you from problems. And it applies to this case, maybe you want to play with a friend somewhere and don’t have any internet connection at the moment.
However there are many uses in looking at chess.com and lichess for reference, maybe you just want to set up a quick chess board without double checking. Or Perhaps you have already “supposedly” setted up the chessboard but you don’t know if it is correct, it is also useful for double checking.
Also the last benefit in consulting the known chess platforms is you can study setting up the chessboard while having a guide, like hitting two birds with one stone.
To set up a chess board there are some things to consider,one is the placement of the chess notation engraves to make things more readable. After that, place the pieces in this order: rook, knight, bishop, queen, king, then pawn, it will be easier to assemble everything this way.
Since you are doing things one by one it will be easy to spot where you have made a mistake, you can even go to chess.com or lichess to double check, once you memorize everything you are good then. It is only a matter of familiarity then, thank you for reading.
